5d82a57db4contrib: remove torv2 seed nodes (Jon Atack)5f7e086daccontrib: update generate-seeds.py to ignore torv2 addresses (Jon Atack)8be56f0f8ep2p, refactor: extract OnionToString() from CNetAddr::ToStringIp() (Jon Atack)5f9d3c09b4p2p: remove torv2 from CNetAddr::ToStringIP() (Jon Atack)3d39042144p2p: remove torv2 in SetIP() and ADDR_TORV2_SIZE constant (Jon Atack)cff5ec477ap2p: remove pre-addrv2 onions from SerializeV1Array() (Jon Atack)4192a74413p2p: ignore torv2-in-ipv6 addresses in SetLegacyIPv6() (Jon Atack)1d631e956fp2p: remove BIP155Network::TORV2 from GetBIP155Network() (Jon Atack)7d1769bc45p2p: remove torv2 from SetNetFromBIP155Network() (Jon Atack)eba9a94b9ffuzz: rename CNetAddr/CService deserialize targets (Jon Atack)c56a1c9b18p2p: drop onions from IsAddrV1Compatible(), no longer relay torv2 (Jon Atack)f8e94002fcp2p: remove torv2/ADDR_TORV2_SIZE from SetTor() (Jon Atack)0f1c58ae87test: update feature_proxy to torv3 (Jon Atack) Pull request description:  This patch removes support in Bitcoin Core for Tor v2 onions, which are already removed from the release of Tor 0.4.6. - no longer serialize/deserialize and relay Tor v2 addresses - ignore incoming Tor v2 addresses - remove Tor v2 addresses from the addrman and peers.dat on node launch - update generate-seeds.py to ignore Tor v2 addresses - remove Tor v2 hard-coded seeds Tested with tor-0.4.6.1-alpha (no v2 support) and 0.4.5.7 (v2 support). With the latest Tor (no v2 support), this removes all the warnings like those reported with current master in https://github.com/bitcoin/bitcoin/issues/21351 ``` <bitcoind debug log> Socks5() connect to […].onion:8333 failed: general failure <tor log> Invalid hostname [scrubbed]; rejecting ``` and the addrman no longer has Tor v2 addresses on launching bitcoind. ```rake $ ./src/bitcoin-cli -addrinfo { "addresses_known": { "ipv4": 44483, "ipv6": 8467, "torv2": 0, "torv3": 2296, "i2p": 6, "total": 55252 } } ``` After recompiling back to current master and restarting with either of the two Tor versions (0.4.5.7 or 0.4.6.1), -addrinfo initially returns 0 Tor v2 addresses and then begins finding them again. Ran nodes on this patch over the past week on mainnet/testnet/signet/regtest after building with DEBUG_ADDRMAN. Verified that this patch bootstraps an onlynet=onion node from the Tor v3 hardcoded fixed seeds on mainnet and testnet and connects to blocks and v3 onion peers: `rm ~/.bitcoin/testnet3/peers.dat ; ./src/bitcoind -testnet -dnsseed=0 -onlynet=onion` 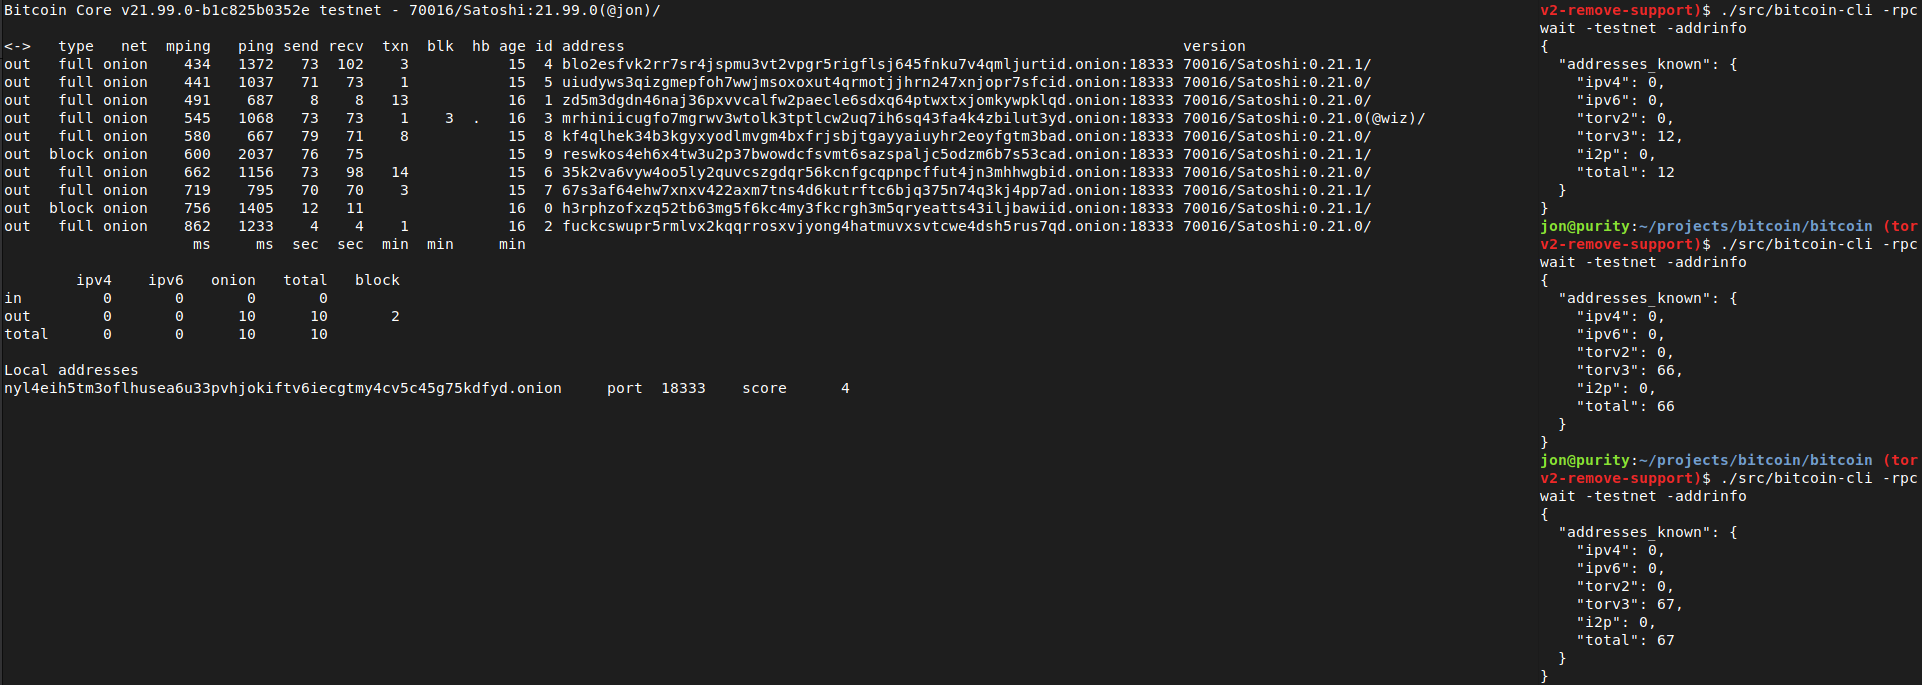 Tested using `addnode`, `getaddednodeinfo`,`addpeeraddress`, `disconnectnode` and `-addrinfo` that a currently valid, connectable Tor v2 peer can no longer be added:  Thanks to Vasil Dimov, Carl Dong, and Wladimir J. van der Laan for their work on BIP155 and Tor v3 that got us here. ACKs for top commit: laanwj: Code review ACK5d82a57db4Tree-SHA512: 590ff3d2f6ef682608596facb4b01f44fef69716d2ab3552ae1655aa225f4bf104f9ee08d6769abb9982a8031de93340df553279ce1f5023771f9f2b651178bb
This directory contains integration tests that test bitcoind and its utilities in their entirety. It does not contain unit tests, which can be found in /src/test, /src/wallet/test, etc.
This directory contains the following sets of tests:
- functional which test the functionality of bitcoind and bitcoin-qt by interacting with them through the RPC and P2P interfaces.
- util which tests the bitcoin utilities, currently only bitcoin-tx.
- lint which perform various static analysis checks.
The util tests are run as part of make check target. The functional
tests and lint scripts can be run as explained in the sections below.
Running tests locally
Before tests can be run locally, Bitcoin Core must be built. See the building instructions for help.
Functional tests
Dependencies
The ZMQ functional test requires a python ZMQ library. To install it:
- on Unix, run
sudo apt-get install python3-zmq - on mac OS, run
pip3 install pyzmq
Running the tests
Individual tests can be run by directly calling the test script, e.g.:
test/functional/feature_rbf.py
or can be run through the test_runner harness, eg:
test/functional/test_runner.py feature_rbf.py
You can run any combination (incl. duplicates) of tests by calling:
test/functional/test_runner.py <testname1> <testname2> <testname3> ...
Wildcard test names can be passed, if the paths are coherent and the test runner
is called from a bash shell or similar that does the globbing. For example,
to run all the wallet tests:
test/functional/test_runner.py test/functional/wallet*
functional/test_runner.py functional/wallet* (called from the test/ directory)
test_runner.py wallet* (called from the test/functional/ directory)
but not
test/functional/test_runner.py wallet*
Combinations of wildcards can be passed:
test/functional/test_runner.py ./test/functional/tool* test/functional/mempool*
test_runner.py tool* mempool*
Run the regression test suite with:
test/functional/test_runner.py
Run all possible tests with
test/functional/test_runner.py --extended
By default, up to 4 tests will be run in parallel by test_runner. To specify
how many jobs to run, append --jobs=n
The individual tests and the test_runner harness have many command-line
options. Run test/functional/test_runner.py -h to see them all.
Troubleshooting and debugging test failures
Resource contention
The P2P and RPC ports used by the bitcoind nodes-under-test are chosen to make conflicts with other processes unlikely. However, if there is another bitcoind process running on the system (perhaps from a previous test which hasn't successfully killed all its bitcoind nodes), then there may be a port conflict which will cause the test to fail. It is recommended that you run the tests on a system where no other bitcoind processes are running.
On linux, the test framework will warn if there is another bitcoind process running when the tests are started.
If there are zombie bitcoind processes after test failure, you can kill them by running the following commands. Note that these commands will kill all bitcoind processes running on the system, so should not be used if any non-test bitcoind processes are being run.
killall bitcoind
or
pkill -9 bitcoind
Data directory cache
A pre-mined blockchain with 200 blocks is generated the first time a functional test is run and is stored in test/cache. This speeds up test startup times since new blockchains don't need to be generated for each test. However, the cache may get into a bad state, in which case tests will fail. If this happens, remove the cache directory (and make sure bitcoind processes are stopped as above):
rm -rf test/cache
killall bitcoind
Test logging
The tests contain logging at five different levels (DEBUG, INFO, WARNING, ERROR
and CRITICAL). From within your functional tests you can log to these different
levels using the logger included in the test_framework, e.g.
self.log.debug(object). By default:
- when run through the test_runner harness, all logs are written to
test_framework.logand no logs are output to the console. - when run directly, all logs are written to
test_framework.logand INFO level and above are output to the console. - when run by our CI (Continuous Integration), no logs are output to the console. However, if a test
fails, the
test_framework.logand bitcoinddebug.logs will all be dumped to the console to help troubleshooting.
These log files can be located under the test data directory (which is always printed in the first line of test output):
<test data directory>/test_framework.log<test data directory>/node<node number>/regtest/debug.log.
The node number identifies the relevant test node, starting from node0, which
corresponds to its position in the nodes list of the specific test,
e.g. self.nodes[0].
To change the level of logs output to the console, use the -l command line
argument.
test_framework.log and bitcoind debug.logs can be combined into a single
aggregate log by running the combine_logs.py script. The output can be plain
text, colorized text or html. For example:
test/functional/combine_logs.py -c <test data directory> | less -r
will pipe the colorized logs from the test into less.
Use --tracerpc to trace out all the RPC calls and responses to the console. For
some tests (eg any that use submitblock to submit a full block over RPC),
this can result in a lot of screen output.
By default, the test data directory will be deleted after a successful run.
Use --nocleanup to leave the test data directory intact. The test data
directory is never deleted after a failed test.
Attaching a debugger
A python debugger can be attached to tests at any point. Just add the line:
import pdb; pdb.set_trace()
anywhere in the test. You will then be able to inspect variables, as well as call methods that interact with the bitcoind nodes-under-test.
If further introspection of the bitcoind instances themselves becomes
necessary, this can be accomplished by first setting a pdb breakpoint
at an appropriate location, running the test to that point, then using
gdb (or lldb on macOS) to attach to the process and debug.
For instance, to attach to self.node[1] during a run you can get
the pid of the node within pdb.
(pdb) self.node[1].process.pid
Alternatively, you can find the pid by inspecting the temp folder for the specific test you are running. The path to that folder is printed at the beginning of every test run:
2017-06-27 14:13:56.686000 TestFramework (INFO): Initializing test directory /tmp/user/1000/testo9vsdjo3
Use the path to find the pid file in the temp folder:
cat /tmp/user/1000/testo9vsdjo3/node1/regtest/bitcoind.pid
Then you can use the pid to start gdb:
gdb /home/example/bitcoind <pid>
Note: gdb attach step may require ptrace_scope to be modified, or sudo preceding the gdb.
See this link for considerations: https://www.kernel.org/doc/Documentation/security/Yama.txt
Often while debugging rpc calls from functional tests, the test might reach timeout before
process can return a response. Use --timeout-factor 0 to disable all rpc timeouts for that partcular
functional test. Ex: test/functional/wallet_hd.py --timeout-factor 0.
Profiling
An easy way to profile node performance during functional tests is provided
for Linux platforms using perf.
Perf will sample the running node and will generate profile data in the node's
datadir. The profile data can then be presented using perf report or a graphical
tool like hotspot.
To generate a profile during test suite runs, use the --perf flag.
To see render the output to text, run
perf report -i /path/to/datadir/send-big-msgs.perf.data.xxxx --stdio | c++filt | less
For ways to generate more granular profiles, see the README in test/functional.
Util tests
Util tests can be run locally by running test/util/bitcoin-util-test.py.
Use the -v option for verbose output.
Lint tests
Dependencies
| Lint test | Dependency | Version used by CI | Installation |
|---|---|---|---|
lint-python.sh |
flake8 | 3.8.3 | pip3 install flake8==3.8.3 |
lint-python.sh |
mypy | 0.781 | pip3 install mypy==0.781 |
lint-shell.sh |
ShellCheck | 0.7.2 | details... |
lint-shell.sh |
yq | default | pip3 install yq |
lint-spelling.sh |
codespell | 2.0.0 | pip3 install codespell==2.0.0 |
Please be aware that on Linux distributions all dependencies are usually available as packages, but could be outdated.
Running the tests
Individual tests can be run by directly calling the test script, e.g.:
test/lint/lint-files.sh
You can run all the shell-based lint tests by running:
test/lint/lint-all.sh
Writing functional tests
You are encouraged to write functional tests for new or existing features. Further information about the functional test framework and individual tests is found in test/functional.